Over-Doing It
I just finished a workshop on the Oregon coast and realized an important addition to my last post about personal resolution. In that article I was encouraging photographers to increase their own personal resolution by improving their photographic technique. But on the workshop I realized that some photographers have too much resolution! How is this possible? As we were photographing along the beautiful coast I noticed that several of my students were evaluating the focus of their images by cranking up the magnification on their camera LCDs to 10x or more. Whoa there Bucko, back off on the magnification, you’ve gone a bit too far! Nothing will ever look in focus at this degree ofenlargement. I don’t even go to 5x. I might pop the little magnification button one or twice to enlarge the picture but no more. Plus, all you are really evaluating is the resolution of your camera’s LCD screen. Rather than pumping up your image on your LCD to check for focus just do the best job you can when you take the picture, check it on the LCD briefly but then carry on and take more pictures. Wait to carefully evaluate your images when they are up on your computer. If you are not sure of the focus take several shots and if you can bracket the focus by moving your focusing point within your composition. Then all you have to do is pick the best one when you look at them on your computer. So don’t be a resolution over-achiever. Once something is in focus it can’t get more in focus.
A Bit of News

Well, its been an traumatic 7 months for me- I’ve lost my dad, my mother-in-law and my surrogate grandfather. Each one is a huge loss for me but each one was ready to go and went peacefully on their own terms. Sad but very much a blessing. And each one would stubbornly insist that life go on. So if I seem more fortified and a bit more resolute than ever understand that I carry with me the spirit of these three wonderful and remarkable people. It is such a gift to be so blessed. I am a lucky man.
Your Resolution
What is Your Resolution? I don’t mean to be a curmudgeon (that is not entirely true) but what is it these days with this unholy quest for ever-higher resolution? It wasn’t too long ago when we were pretty happy about a 2000 ppi scanner, that is until the 4000 ppi scanners came out. But at least we were really happy with the 4000 scanners. With 4000 pixels per inch we could make big prints that looked great. Why would we ever want or need more? We didn’t until the 5000 ppi and the 8000 ppi scanners were introduced. Suddenly the 4000 ppi scanners we once loved were no good. After all, if 4000 ppi is good isn’t 5000 ppi better? This lust for more is not restricted to scanners, unfortunately, it has spread to everything and to all aspects of photography. If a 6 mega pixel camera is better than a 3 meg. camera isn’t an 8 meg. camera better than a 6? And if 8 meg. is really good than 12 or 16megs must really, really be good. Photographers are about as sensible as hound in heat. And let’s not even bring up 6 frames per second motor drives vs. 8 or 12fps or 11 auto focus points vs. 51. Here’s an idea: lets put so many auto focus points in our viewfinders that we spend all our time selecting points and in the process missing the shot. It will be like a Gameboy with a lens. Who cares about actually taking a picture? So as I understand this, the cameras and scanners (and printers, and memory cards, etc.) that we were so happy with a year ago (a day ago?) must actually have been inadequate and we just didn’t know it. It follows then that the gear we have now is also inadequate but we don’t want to think about it. Either we are all idiots or we are all ignorant. Take your pick. Here is what has happened: We have all been seduced into thinking that more megabytes and higher resolution are better and that somehow (apparently magically and without effort) if you have more and higher you are a better photographer. It doesn’t matter how the equipment is used, if you can get more pixels, dots and bytes you will be a better photographer. Spend your money, improve your photography. This is a wonderful world in which we live. But here is the question: You know what the resolution is of all your equipment but what is your resolution? What is the resolution of your technique, your craftsmanship? Can you get 4000 ppi out of your photography? Can you get 2000? If you have sloppy technique and awful craftsmanship no matter what the resolution of your digital gear is your pictures will be terrible. Let me repeat that. If your technique is sloppy and low res your pictures will be sloppy and awful. The resolution of your technique is far more important than the resolution of any of your equipment. Nothing contributes more to the outcome of your image. The problem is that you can’t buy technique (although coming to one of my workshops would certainly help!). Better technique can only be learned through practice and dedication. For you digital folks out there who don’t believe anything unless there are numbers involved, if your technique has a resolution of 1000 ppi it doesn’t matter what the resolutions of your gear are your images will have a resolution of 1000ppi. You all will recognize this as the much said but little appreciated: garbage in, garbage out. It doesn’t matter how much the garbage cost or how fine its resolution, it is still garbage. So what are the most common reasons for low personal resolution? 1. You spend $5000 for a camera and $50 for a tripod. You know you should use a tripod but you really don’t want to so you go out and buy the next to cheapest tripod you can find (you don’t want to be accused of being really cheap). Then you put your expensive camera on it. I see this every workshop I teach. For some reason photographers have a really hard time spending more than $100 for a tripod. They will spend $5000 for a camera they really don’t need but they won’t spend $400 for a sturdy tripod they do need. Go figure. Many of today’s cameras and lenses are getting bigger and heavier with every new model. This means you must have a very sturdy tripod to hold these new cameras. The ball of your ball head must be at least golf ball size. Cue ball size is even better (the bigger the ball the more surface area there is to grip on to, the steadier it is). If it is a particularly big camera or lens than your ball should be tennis ball size. Don’t bother arguing with me, you now I am right. Go out and get a good tripod and a good tripod head. Your pictures will thank you. 2. You rely on VR or IS technology when you shouldn’t. Image stabilization technology is never as sharp as using a tripod. Never. The only time you should use image stabilizing/vibration reduction technology is when it is not possible to use your tripod. Laziness, fatigue or my personal favorite, elaborate rationalization are not reasons to leave your tripod in your car. And no, you can’t shoot a sunrise or sunset handheld, at least not a good one. If you do manage to get your shutter speed high enough to justify hand holding chances are your depth of field is insufficient, the ISO is so high that there is grain every where, or the light is hideously contrasty. Even if you get a sharp picture hand holding your compositions will always suffer because you won’t be able to carefully consider all the important compositional elements of your picture. You’ll get a nice, sharp mediocre picture. Oh, joy! VR
Hugh

Hugh Bromley died early this morning in his sleep in the same room in his house that his wife, Joan, died 4 years ago. He was in his 96th year, as he would say, the last of the sixth generation of Bromley dairy farmers in Danby. All but four of his years he spent on the farm watching as the first gas and then electric lights came into the valley, the first car came up the road, the first voices were heard over a wire and the first tractor pulled a wagon up the hills. He fought with Patton in the Battle of the Bulge and was tough on nearly everyone else in Danby when he got home but I knew him as a sweet old man and I loved him dearly. Last fall Roger and Trish moved up the hill from their little house to the big, empty house where Hugh lived all by himself. This is the same house in which Hugh spent his childhood, brought his new wife after the war, raised a family and saw Joan pass away. Enid, Trish’s 82-year old mother, moved in to the house as well to be closer to the care from her daughter. Together, the four of them reanimated the old house and made it the warm old home it once was. Up until his last few days Hugh lived in his recliner in the extended kitchen- parlor in the front of the house. In January macular degeneration stole the last of his eyesight and by February arthritis had robbed him of his mobility. Unable to get to the barn just 200 feet away he spent all of his time in his recliner, sleeping, eating and listening to the farm go by. In May as the grass greened the meadows with the promise of hay, Hugh began to finally fade away as age and delirium savagely crept through his body. This last week I visited him often. He always remembered me and recognized my voice and would ask me what was happening on the farm. He knew it was getting on to be June and that it was time for Roger to finish up down at Hoppers and start planting corn in the road patch below the house. He also always remembered Abe, “you old scoundrel’ he would say, and would reach out his hand to find Abe’s head and give it a little scratch. I will miss my old friend, miss his stories, his twinkle in his eye, his steadfastness. Hugh, along with Roger, introduced me to this farm and in many ways to a new, richer life. His generosity and his acceptance of a ‘flatlander’ in his barn opened up my world and filled it with incredible joy and wonderment. I will forever be thankful for my time with him. It was an amazing gift and I am a much better person for knowing and loving him. And now I sit on the bale of hay Hugh would sit on in the milking barn as he waited for Roger to catch up and finish the milking. Piper, the barn cat, sits on my thigh just as he sat on Hugh’s and Abe lies quietly at my feet as he did with Hugh waiting for an old hand to reach down and stroke his head. Hugh would sit here and watch the old cows in front of him eat their silage. “This one can really eat, she’s been a real good cow. But she’s,” pointing to the one next to her with his ski pole cane, “a picky old bitch. Yes she is.” And then he would stand and push a scraper up the manger, one of the few chores he could still do in his barn. I’d often sit next to him and we would talk. Mostly he would talk and I would be happy to listen. More often than not it was the back-when stories he so loved to tell and I so loved to hear. I’d write as many of them down as I could but my ear missed more than it caught and I lament all the lost stories. My heart, though, never missed a thing and every year, sitting with Hugh, it grew fuller. Eventually Hugh would slowly stand and grab the scraper mumbling “yer a good ol gal” to his favorite cows as he shuffled down the manger. He has shuffled down his last manger now, off for good to rest on another bale of hay. I know he’s still watching the farm but now his sweet Joanie is by his side. After 60 years of being together I am sure the last four have been terribly lonely for both of them. Joan is probably humming a little French tune and Hugh is most certainly wearing his old brown rubber boots ready for the next chore. There are probably not many old cows up there in heaven for Hugh to talk to but there must be plenty of old tractors and acres of tall, grassy meadows. And certainly there are piles and piles of cow shit. Why else would a dairy farmer call it Heaven? I will miss you my friend. I will miss you a lot.
Oregon Coast Workshop

I wanted to let you all know that there are still a few places left on my Oregon Coast workshop. The workshop is in Newport, Oregon on the central coast July 18 – 22. Sign-ups are through The Santa Fe Workshops. This workshop is one of my favorite summer workshops and I love being on the Oregon Coast in July- there is usually fog in the morning and at twilight in the harbors, the beaches and lighthouses are not crowded and the evenings are gloriously long. The two big highlights of this workshop are the great tide pools choke full of big green anemones and huge red and orange seastars and our time at the beautiful Oregon Coast Aquarium. We get into the aquarium a couple of hours early so we have the place to ourselves to photograph the amazing and bizarre animals inside. I am always amazed at the images that come from this shoot. Finally, if you are into harbors (and who isn’t?) Newport has a spectacular working harbor with lots full of piles and piles of very colorful nets and ropes. It is a blast to not only photograph the boats but also to play with all the wonderful shapes and textures of the piles. Come on out to Oregon. My great buddy and teaching partner, Brenda Berry, is my co-teacher so that pretty much guarantees a fun experience for all. We suggest that you take an extra few days to explore the coast. We will be glad to suggest some more places to go and photograph. Hope to see you there! [nggallery id=21]
Critique-speak
Over the last almost 30 years of doing critiques at my workshops I have come to realize that I say the same few things over and over again. It is not because I am unimaginative or at a loss for better words. And it is not because I don’t see some really great images every workshops (I do!) Its more that all photographers (including me sometimes) make the same mistakes no matter how long they have photographed or how many workshops they have attended. Here are my most common critique comments followed by a short explanation. 1. “Tell me what you were thinking” Thinking is a really good habit to get into when you are photographing. You are not just out there pointing your camera at things and hoping for the best. You are being deliberate and composing with consideration and forethought. It doesn’t make any difference how many pictures you take on an outing. It only matters how many good pictures you take. So stop and think and consider what you are doing. In other words, slow down. If you aren’t sure what it is you are doing or what it is you like I promise when I see them I won’t either and that is not a good thing! Take your time, think about what you are doing and then take a picture. 2. “Tell me what you liked about this scene” A good composition is a clear representation of your creative vision so a viewer should have a clear idea what it you liked about a particular situation. Usually what happens is that I have an idea of why the person initially liked but because he or she has added so much other stuff to the composition- the sky, framing branches, more to the left or right, top or bottom- the initial creative idea is lost, drowned in a sea of other mediocre stuff. Be confident in what you liked and just photograph that. Don’t add stuff- it only diminishes the final image. 3. “Did you mean to include this?” People seldom look at the edges of their compositions. I mean really, why would they? The subject is somewhere in the center of the picture, who cares about the edges? I care and you should to. Edges can be very distracting and will pull the attention of your viewer away from your intended subject. Bright spots, anomalous colors, weird parts of animals or things, bad blurs are all bad compositionally. Before you push your shutter scan you eye around the edge of your viewfinder and look for odd bits of stuff. If you have a less than 100% viewfinder (and chances are you do) zoom back a wee bit to see all that is going to appear in your image. 4. “You have over sharpened/over saturated this image” Here is my rule: Move the slider or the dial or whatever it is you move to adjust your picture in your processing program to where you like it and then back off. Here is another way of saying this- make an adjustment until you go ooh and then back off. Ooh is always too much. I know in this supersized world of excess we all live in saying this is practically anti-American but in photography excess is bad. Think of the Puritans. Would they ever go ‘ooh!’ to anything? NO! Process like a Puritan. If you have to, supersize your drink and but not your processing. 5. “You’ve cut off the feet (ears, hands, top of the head, etc)” We all spend so much time concentrating on the head and trying to get the focusing point squarely there that we tend to forget that animals (people!) have feet and ears and tips to tails. Eventually you will learn to attend to all of the animal when you are photographing but at first it is a really hard thing to do. So let your eye look away from the head and notice the extremities before you push the shutter. 6. ” Nice composition but bad light” I have saying this on every workshop I have ever taught and at every critique I have ever done- “dull light = dull photo.” There are no exceptions, no excuses, no way to get out of it. So if dull light is always bad why photograph? Either wait for different light or change the light with a flash or reflector or your shadow. Do something just don’t be satisfied with dull/bad light. 7. “That bright spot is very distracting” Your eye will go to the brightest part of your composition. If it is not part of your subject your picture is going to suffer. Now sometimes a blown out highlight can’t be avoided, I understand that but it can’t be on an important part of your subject. It’s best that there aren’t any blown out highlights, mind you. So wait for better light and pay attention to those blown out whites. This is what your histogram is for! 8. “You just missed the focus” Proper focus is not relative. It is either in focus or out of focus- there is no sort of in focus. Focus is like pregnancy and hemorrhoids- a straight yes or no- you can’t be sort of pregnant or sort of have a sore ass. Same with focus. For wildlife/people the eyes have to be in focus. For everything else where you want us to look has to be in focus. Besides, things that are slightly out of focus are really, really distracting. Better to be way out of focus (the mind doesn’t try to resolve it) than just off. 9. ” Just because you see the moon you don’t have to include it” This happens all the time- I see a nice picture but there is something wrong- it is oddly stretched. Then I notice that the moon has been included. Okay, the moon was there when you were taking your photo, I get that. But was
Common Mistakes Photographers Make

Photographers… 1. Include too much in picture Photographers are to prone add compositional elements to their initial creative vision- more foreground, the trees over there, the sky, that barn, the tree tops- but it is invariably a bad choice to make. The strongest photos are ones that can be described by a phrase; these are simple and obvious compositions. The weakest photos take a paragraph to describe because there is too much included in the composition. 2. Make uncomfortable crops People have feet, so do wild animals (domestic ones too!) so don’t crop your critters at the ankles. Either include the feet or crop well above the feet. Don’t crop at a joint. Same for tails and ears- either include all of them or none but don’t show us just a little. 3. Don’t ‘work’ a subject There are always more than one image to take of any subject and yet most photographers are content to get one and then pronounce “I’ve got it, what’s next?” Try changing your perspective by getting lower or higher or moving left or right. Change lenses, change f-stops, change shutter speeds, change your attitude. Each will lead to better pictures. 4. Shoot everything at their eye level The most compelling images are those in which you enter the subject’s world. You do this by photographing at the subject’s eye level. This is especially true for wild animals, pets and children. Knees do bend, try it. Here’s a trick: if you can’t get eye level low than shoot the subject at a bit of a distance. The farther away the more the angle looks like an eye level perspective. 5. Put their subjects dead center in composition A subject in the dead center is a deadly dull composition. If the subject is moving place it to the side so that it has space to move into. If the subject is looking one direction give more space to that side so the subject has space to look into. If the subject is an object include other parts of it to make the composition asymmetrical. If the subject is just a blob doing nothing, don’t take its picture. BTW, if your name is Lisa Cueman ignore all of the above. 6. Don’t shoot enough verticals Many subjects look best in a vertical format rather than in a horizontal format especially ones with strong vertical lines. And don’t confuse cropping a horizontal to make a vertical with shooting a vertical. One is a lazy afterthought and the other a good creative choice. 7. Think they can fix every problem in their computer. If you fix your composition before you take the picture you won’t have to fool around with it in your computer. It is almost always much easier to fix a picture in the field than it is to do it in the computer so reach in and remove that stick or hide that bright spot or level the horizon before you push your shutter. 8. Don’t pay attention to the quality of the light It’s all about the light- dull light = dull photo no matter what, no exceptions. but if you get great light, even a dull subject can look great. So be patient and wait for good light before you push your shutter. And no you can’t create good light in your computer. You may be the best photographer in the world but only god does light. Sorry. 9. Don’t look for the best subjects to photograph Not every subject is created equal. Some are faded, some are marred, some aren’t yet ready, some are discolored, some are soiled, some have been chewed on, some lie next to foot prints, some have bad backgrounds, some are just plain butt ugly. don’t pick any of these to photograph. God does light but you get to pick which one to photograph- choose wisely! 10. Photograph people in direct sunlight Unless you like pictures of your friends and family with little squinty eyes and wrinkled up faces don’t photograph them in direct sunlight. Find some open shade and your friends and family will appear human again. And no, a hat doesn’t work- it just throws a really dark shadow across the face. If the picture is worth taking then move the people into a situation worthy of your friendship. 11. Avoid interacting with people before photographing them Yes, you can sneak a picture of that person across the street without them knowing it but really, is that how you would like to be treated? Isn’t it just a wee bit rude and rather unfriendly? The alternative is to actually interact with your potential subject. Yes, this means making eye contact and smiling and taking some time before you take the photo but your results will be much, much better. 12. Don’t check their histograms often enough. This is one of the biggest advantages of digital photography. Your histogram tells you what your exposure is going to be. It makes your exposures predictable. No more guessing! So why wouldn’t you check your histogram after every shot? Buehler? Buehler? No good reason, sorry. Make it part of your photography routine. 13. Carry too much equipment I did my last two books with two lenses- 16-35mm and a 28-300mm. I did my farm book with a 12-24mm and a 24-120mm. I went to Bhutan, Antarctica, New Zealand and South Africa with three lenses (I either added a the 24-120 as a back-up or my 200-400mm for wildlife). In my bag there is one split neutral density filter and one polarizing filter. Oh and I have some lens hoods for photographing when it rains. Less gear makes it easier not harder to take great compositions because you concentrate on the picture not the stuff you are carrying. 14. Spend too much time reading blogs and product reviews Go outside, I’m begging you. Get some color. Talk to someone. Figure out what season it is. That warm bright thing in the
Travel (hand held) Composition

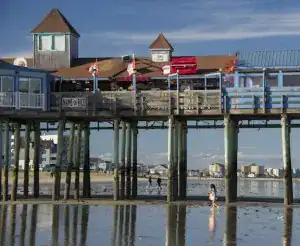
In my previous post I wrote all about the technical side of travel (hand-held) photography- low light, high ISO, more open f-stops, faster shutter speeds, smaller depth of field, etc. All good stuff and important to understand and use next time you are out hand holding your camera. For this post I wanted to tell you about a strategy of professional travel photographers for getting great shots. It is unlike anything you do in any other genre of photography but it is a very successful compositional technique. I call it the ‘wine in hand’ strategy of travel photography. When we are out taking pictures we spend most of our time looking for things to photograph. It is like we are looking for targets, aiming our lenses at them and then pressing the shutter to shoot them. We then go out and look for more targets. But there is a different way to go out and get your pictures. Instead of looking for targets try looking for backgrounds instead. What? That doesn’t make sense! I am supposed to look for a background and then what? Wait for a subject to walk by? Really? Are you nuts? Perhaps but not this time. Most genres of photographers can’t do this because there are not enough subjects wandering around to make this strategy effective. A flower photographer isn’t going to find a nice stream and wait for a flower to grow next to it. A wildlife photographer isn’t going to look for a nice meadow and then wait for a bear to walk through it. And a macro photographer isn’t going to find a nice stalk and wait for a spider to come along and spin a web. But a travel photographer can find a great background and wait for a great subject to wander past because just about any where you go in this world there are lots of people and one is likely to come on by. My friend Bob Krist, the National Geographic photographer, tells about waiting at a cafe across the street from his selected background and watching for a subject to wander by. Hence the ‘wine in hand’ name. Nature photographers have a compass in their hand, a travel photographer has a glass of wine. I told my class in Santa Fe about this technique the day after they stumbled around mostly unsuccessfully trying to chase targets. They all went out, found a good situation with a great background and then simply hung out until someone came by. They got really nice images by just being patient and not wandering around. Find a background and wait for your subject. I used this strategy when photographing the pier at Old Orchard Beach on the coast of Maine. The scene was easy to find- anyone would’ve stopped to take that picture but I waited for the girl to come into the scene to make the image more than just a picture of the pier. All it took was a bit of patience. You can use this strategy with wildlife photography if your subject moves in a predictable, repeating pattern. Think about a bird returning to the nest or a mammal returning to a food source. Or…when photographing at Triple D Game Farm…think about one of their animals repeating his movements as he is rewarded with little pieces of meat. For the red fox picture I saw the tree and the snow on the roots when I first got into the compound where the fox was going to run. I wanted the fox to be next to the tree looking out so I set up that composition based on this background and waited for the fox to be in the right spot. I didn’t follow the fox around with my camera I simply set up the composition, locked it in and waited for the subject to appear. When it did, presto! So go out and instead of chasing targets, look for great scenes, great backgrounds and then stop, find a wall to lean on or an empty chair and wait. Then wait some more. Eventually just the right person or car or wagon or animal will come by and you’ll get a great shot. Remember, the goal is not to get a lot of good shots but instead get a few great shots.
Travel Photography
I just finished teaching a travel photography workshop in Santa Fe, New Mexico at the Santa Fe workshops. It was a good class, with great participants, perfect weather and lots and lots of things to photograph in and around Santa Fe. I do love that town; it is very art- and food- centric, its got two Whole Foods and the pre-trip scouting took me to wonderful places. Travel photography is different than nature or landscape or wildlife photography. And not just because of the subject matter. In fact, what you shoot has little to do with defining the travel photography genre. Every where you travel you can see some form of wildlife, landscape or nature so it all fits into the Travel Photography subject category. There are two things that separate travel photography from all other types of photography: the fact that you are telling the story of a place and you are usually doing it hand held. Let me explain. Remember that all photography is based on pretty light. Most of the time this means low light. Low light means slow shutter speeds. This is why nature, landscape and wildlife photographers use tripods. In travel photography though there is often no tripod and if there is a tripod involved it is usually no more than a mini table top version, not a full sized one like one might normally use. This means that you are typically hand holding your camera. If you are hand holding your camera in pretty (low) light your shutter speed becomes very important- too slow and you are toast. You can’t hand hold your camera at a 15th of a second or slower and get an acceptably sharp image. If you think you can you are either a truly exceptional photographer, a corpse or you need to refresh your thinking of what a sharp photograph really is. When hand holding, shutter speeds of at least 30th of a second or faster are the minimum necessary to be get sharp focus. This is a much faster shutter speed than is typical with most nature photography with a tripod where I often shoot half second to four second exposures. Since faster shutter speeds are necessary when hand holding you need to use more wide open f-stops. Nature photographers often shoot at f16 or f22 but travel shooters often use f4 and f5.6. Remember, to get faster shutter speeds you need to allow more light into your camera therefore wider open f-stops. But with more wide open f-stops you have much less depth of field. This means instead of looking for compositions that have everything in focus from near to far you must instead look for compositions that are flatter with much less inherent depth of field. Let me go over that one more time. Lets say that you want a composition with everything in focus. If you are on a tripod you can shoot at very small f-stops (f16 or f22) bring the foreground into just a couple of feet away and blast away confident that you will have enough depth of field to get everything in focus. You don’t care about your shutter speed because you are on a tripod. If you are hand holding instead then you do care about your shutter speed. If you try to set up the same composition hand holding as with the tripod using f16 or f22 you won’t have enough shutter speed. So you open up your f-stop and find that at f5.6 you get a shutter speed of 30th of a second. But now your composition doesn’t work because you no longer have enough depth of field. Assuming you still want a picture with everything in focus you will have to push back your foreground to being no closer than 25 to 30 feet away. On a tripod you can get everything in focus from 2 feet to infinity; handheld at f5.6 or f8 it will be closer to 20 feet to infinity. Now you can soften the restrictiveness of all this by cranking up your ISO but you can only go so far. Shooting at f16 at 1/4 of a second ISO 200 will give you the same exposure as f16 at 30th of a second at ISO 1600. Whenever I am in low light I will raise my ISO to 1600. If I’m in really low light I will shoot at ISO 2500 or even 3200. I know not all cameras can go up that high and still get high quality images but I bet yours can go higher than you think. Even with a higher ISO your depth of field isn’t going to change much though. This is because when hand holding your camera most people will choose to shoot at a stop or two higher shutter speed than to close down their f-stop. Did I lose you along this long decision path? I’ll review: travel photography usually means hand holding your camera. This means you need a fairly high shutter speed. You can do this by cranking up your ISO (don’t go too high!) in really low light and opening up your f-stop (to f4, f5.6 or f8). When you open up your f-stop you lose your depth of field. This means you must look for compositions that are flatter (less depth of field needed) and that start farther away (their closest point is 30 to 40 feet away from you). Basically, you are wearing a different hat when you are shooting travel, a hat you have to remember you are wearing! You can’t hand hold a classic nature, wildlife or landscape photography shot so don’t try. You are not wearing those hats, you are wearing a travel photography hat. If you keep this straight and you follow the thinking I have outlined above your travel shots will soar.
Setting Up Your Camera
It is workshop season once again for me and I am starting to notice some commonalities amongst my students. In every workshop I have done lately I have found that at least half of the cameras I get my hands on are set up less than optimally. By ‘set up’ I mean that the options selected in the menu are not the best. And no what I am about to mention are not ideas open to debate. These are the right ways for you to set up your camera. If you don’t agree with all this then either you are misinformed, just being stubborn or have some very individual photography needs. These ways are the ways that all the pros I know have their cameras set. 1. Adobe 98 color space. sRGB seems to be the default on most cameras but it is limiting the colors you get. Adobe 98 gives you the most colors. Who would want less colors? Use Adobe 98. 2. Go to Display in your menu and activate both histogram and highlights. Histogram will show you all the tonalities in your image. Be sure to check it after every different shot. HIghlights will activate the ‘blinkies’ on your LCD display showing you where any blown out whites are in your image. The histogram will show you that you have blown out whites, the highlights will show you where they are. Refer to them both frequently. 3. Auto color temperature. I haven’t used a more specific color temperature (cloudy, incandescent, etc) ever. That’s right, ever. You spend good money on a very sophisticated camera. Trust it to do its job. Select Auto color temperature. 4. RAW. shoot in RAW always. There is no good or legitimate reason to shoot JPEGs. Here’s why: Every time you open a JPEG you lose data. Every time. With RAW you can open and play with it all you want and you won’t lose a thing. Plus there is much more data in a RAW file than in a JPEG. Digital photography is all about data. The more the merrier. You will limit yourself if you shoot only JPEGS. And please, please, please don’t shoot RAW + JPEG. That just makes things worse. You will never need to capture both. Never. If you need a JPEG just export as you need from the RAW file. 5. And finally, I shoot Aperture Priority, Matrix (Evaluative in Canon-speak), usually minus .7 auto-compensation ( to catch sneaky blown out highlights), C for continuous autofocus, 11 autofocus points (not 51 or more- too distracting) and a ISO of 800 when I am handholding my camera and 400 when it is on the tripod. I will gladly go up to go up to ISO 2500 or even ISO 3200 for low light situations. These last are all are more personal to choices. The first 4 are the right ways to do things. There you have it. Now goo to your menu and check your settings. You’ll be glad you did.