Polarizers
I am not much of a filter guy- I rely on great subjects in great light. I really try not to create something that isn’t there by using filters, both in my camera and in my computer. It always looks contrived and certainly unnatural. For those of you who are convinced you can create a photo using multiple filters so that the it looks natural and unmanipulated might I suggest you wait for the natural light and take an unfiltered shot? Silly for me to suggest such heresy, I know, but that is just who I am. The one filter I do use regularly is my polarizing filter. For those of you who are unfamiliar with a polarizing filter let me describe it and how it is used. A polarizer is a two piece filter- one part screws into the lens like any filter and the other part, with the help of your hand, turns. When you mount the polarizer on your lens and then turn it as you look through it you should see the scene change. Depending on the lighting conditions that change can be profound or very, very subtle. On a sunny day when the sun is ninety degrees from where you are pointing your camera the polarizer has the strongest effect making blue sky almost navy in color. While dramatic this effect is much too unnatural. The traditional use of a polarizer is to darken blue skies and to remove glare from water. As with anything though you have to be careful. If you use a polarizer with a wide angle lens you are likely to get a blotch of navy sky 90 degrees to you and then much lighter blue sky to the side. This looks very odd. If you use it to remove glare from water you can actually, in some circumstances, visually remove the water. This is because, to our eyes, glare or sheen off water, in large part defines the presences of water. By mistake, I have over-polarized streams in a forest and made the water disappear completely. Not a good look. So how do you know when to stop rotating the polarizer when you are looking through your camera? Turn the polarizer until you go “wow”, and the back off the effect just a tad. this will give you a nice natural looking image. If you don’t see any effect when you are turning the polarizer don’t use it. If it doesn’t help your image there is no point of having it on. Also, the polarizer will cut out one to two stops of light- shutter speed you will likely really want to have. I don’t use polarizers on sunny days. I do use it on cloudy and rainy days all the time. When it is cloudy or rainy any flat surface will reflect the clouds above. When that surface is wet it will reflect even more. We call this reflection glare. Removing this glare (not possible in the computer, by the way) is what a polarizer does and in so doing the true rich colors of your subject come through. Think of glare as whitewash on a colorful mural. Remove that whitewash and the colors come through. Here are some unusual examples of times where a polarizer can be really handy. When photographing a tide pool, a polarizer will allow your camera to peer clearly down to the critters in the pool. You may have to move around the tide pool to find the best angle but it will be worth it. The cloud reflection (glare) ruins the photo. In a forest there are many plants with broad, flat leaves. Every one of these leaves, every one of these little flat surfaces captures glare. A polarizer removes that glare and lets the rich greens of the forest come through. You don’t normally think about using a polarizer in a forest on a cloudy day but it is really effective. So go out and try your polarizer. Try it in all conditions and be aware of the changes you see as you spin it around. Then decide if you like what you see. If you say “wow” you can thank me later.
Interview
I was recently interviewed by a local accomplished photographer, Chris Mazzarella. He has a very nice website that is forestcentric: http://forestforward.com/2012/03/13/an-interview-with-david-middleton-2/ Take a look around on the website and read my short interview- there are pearls to be found, not big ones but some nice small ones. Next month Chris is interview a very well known writer and environmental activist. No I’m not going to tell you, you are going to have to check in to find out.
Short and Sweet
I am going to keep this short and sweet (unlike my recent posts): Here are the things you must do when you are out taking pictures. No arguing, no excuses, no being lazy. Just sit there and listen and then go out and do it. 1. Check your histogram for every shot you take. This is why we use digital technology- we can see what the exposure is going to be. No more guessing. Look at your histogram and you will know what your exposure is going to be. Looking at your LCD on the back of y0ur camera is not good enough. Check your histogram. Every pro does it, shouldn’t you? 2. Use your depth of field preview for landscapes and close-ups. Yes it gets dark when you push the button. It’s okay. Take a breath, wait a moment and your eyes will accommodate to the dim light. Slow down and let your craftmanship come through. What’s the rush. Take a moment and do it right. 3. Think about your background. Bad background = bad picture. No ifs, and or ugly butts. Pick a subject with a background that is supportive of your image. Not distracting, not glaring, not butt ugly. Background is everything- give it the time and effort it deserves. 4. It’s the light, baby, only the light!!! Not the subject, not your ego, not your desires, not your camera. The light is really the only thing that matters in photography. Without good light you won’t get good photos. Without great light you won’t get great photos. Without spectacular light you won’t get spectacular photos. see the pattern? Wait for the light, there is no other way. 5. Do most of your processing in the field. Do all of it if you can. Remove sticks, fix your background, reconsider your framing, adjust your exposure, check your edges, figure out your depth of field all in the field before you push the shutter. If you do you won’t waste your time staring at your computer. Remember, you can’t focus what is blurry and you can’t alter what is way over exposed. And you can’t fix ugly. If you spend more time working on an image than taking it you’ve got things backward. Work on your field technique. 6. Get out and shoot and stop reading blogs! It’s spring! Get outside!!!
Touch
Your indulgence, please. A couple of years ago I had the pleasure of getting to know a wonderful man named John on one of my workshops. He was an older man with a quiet sense of humor, a gentleman in every sense of the word and I really enjoyed my times photographing with him. At the time John was also going through some pretty hard cancer treatments and I admired how he moved through life with a sense of grace and charm- his antidote to what couldn’t have been easy. I asked him once what he had learned in his life. He replied without hesitation, “You never lose the need to be touched.” It hit me like a punch in the gut- a simple yet profound life truth that had eluded me for 55 years. “You never lose the need to be touched.” And now I sit in yet another hospital room. In July I was the patient but of late I have been the son, the son-in-law, the comforter for dear ones who can’t be comforted. I have the early shift, arriving when the world is dark and still and life lies somnolent and hushed. At this time of the day the hospital floor where I sit quietly hums from monitors and machines but there is little movement otherwise, in the halls, in the rooms, or on the bed where I stare. Visitors will come shortly- family, family friends, friends of the family- and the hall and rooms will quiver with activity even as the beds remain still. People will come in and news will be exchanged, updates provided, outlooks hopefully given and then they will sit and watch and wonder and pray. Sometimes small conversations will be exchanged with the patient and sometimes a gentle squeeze will be given but most times that is all. Discomfort is catching in hospitals. Touching is not. Human to human, skin to skin, hand in hand; contact, stroking, the embrace of arms, the shelter of two hearts- the true medicine of wellness and care- absent or fleeting from where I sit. I was once this way. I was once standoffish, uncomfortable with illness, emotionally overwhelmed, barely present. No more. I now dive right in, touching as long as I can, staying in contact as long as I can, being present with a prolonged squeeze, a long rub, a gentle stroke, a soft touch. It is usually inconvenient, often hard and often emotionally trying but it is always magical, always, always magical. Thank you, John. Thank you for your wisdom, for your courage, for your encouragement, your grace. I hope you never have to sit in a hospital room and wait for the rising dawn to bring light into the darkness. But if you do please push the darkness and sadness away with your touch. You too will feel the magic.
It’s all about the Background, Darling

Those of you who have suffered through one of my insufferable workshops will remember me going on and on about background. Usually its during a critique I bellow “background, background, background,” making my point by pointing out bright spots or other distracting things behind the subject. “If the brightest thing in your picture is not the subject, it is a big distraction and your picture suffers.” That is what I say. What I think is “What were you thinking? Were you thinking? Pay attention!!” The background of an image is a very important part of a photograph. It is so important that if the background is bad the photo is automatically bad. There are no exceptions. Bad background, bad image. This means that the background must be a deliberate choice you make. It is not something you just happen to get. You look for a subject and then confirm that the background is good. If the background is not good, no matter how good the subject is- you lose! Bad background that can’t be fixed means you don’t take the picture. (And if you do be very sure you do’t show it to me in a workshop!) Here are some examples of pairs of pictures with the subject basically the same but with the background dramatically better. There are two easy ways to control the background- moving the camera to get a better viewing angle or changing the f-stop to lessen the depth of field and soften the background. Examples of small position change in camera to improve the background: Examples of reducing the depth of field to make the background less distracting. The first pair shows the background I chose for the Texas Bluebonnet and then the final image. I spent a lot of time looking for a flower with just the right background and then some time figuring out which the best f-stop would be to give me the flower in focus and the background out of focus. These are deliberate decisions. With these examples it is plain to see how some easy adjustments make a big difference in the appearance and the impact of the photo. All it takes is paying attention to the area behind your subject and making the necessary changes.
One Step
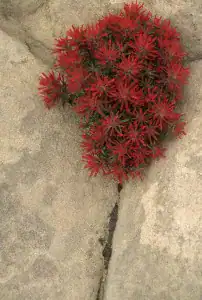
One of the things I most enjoy when teaching a workshop is helping people when they are out taking pictures. Because I don’t take pictures during workshops I spend my time wandering around looking through cameras, making suggestions and answering questions. Doing this is the most effective way to teach photography because the experience is real and the effect immediate. I can show them all kinds of pictures in the classroom but none of it will have the impact of seeing the same effect through their camera. When I am wandering around one of the first things I ask a person is “why are you standing here and not over there or there or there?” The answer I want to hear is it is because if the camera were anywhere else the picture would suffer. The answers I often hear are less compelling- “My camera bag was here.” “It was by the bench.” “It didn’t seem to matter.” “This is where I stopped to rest.” Sorry, not good enough. Where you take a picture is vitally important and will always have an effect on the final image. I’ll go even further and say that for any one picture there is only one best place to stand or set up your tripod. And that one best place is not a very big area. How big is it? It is less than one step in size. One step. Not two steps. Not several steps. One step. Anything larger than one step will have a noticeable effect on your composition. If you find the best place to take your picture, a step to either side will make the picture worse. Here are some examples. The courtyard was visually chaotic when I first looked through my camera but with one step to the right I was able to hide the distant middle post behind the close one and the entire composition simplified. The background of the short-eared owl shot was really contrasty at first but with one step to the right I was able to put the owl in front of the dark shadow behind it and simplify the composition. The indian paintbrush was nicely composed at first but when I took one step to the right the diagonal lines were much more interesting and the composition improved dramatically. (I don’t always step to the right. In fact, since I have moved to Vermont I have been moving to the left more and more. Seems to work better up here.) So be mindful of what you are doing and where you are setting up to take a picture. One step can make a big difference. Let it work in your favor.
Old Friends revisited
I am still going through my 700+ scans of the slides I sent into Scan Cafe and have found lots of images I had completely forgotten about that I still like. I don’t really, really like them but I like them none the less. The reason I don’t really, really like them is because every one of them has a flaw that I see whenever one pops up on my screen. Some have compositional flaws- too tight a composition, distracting stuff on the edges, bad merges, not great background; some have technical flaws- focus is off, depth of field is either too much or too little, viewing perspective is wrong; some just need to be a bit better- light isn’t great, subject could be better, foreground could’ve been better, should’ve gotten closer. They’re nice but I am not taking any to the prom if you know what I mean. Looking at these old friends does make me think of a few things. First, what am I going to do with the many thousand of slides that I didn’t select to be scanned? That ceremonial pyre is sounding better and better all the time. Second, why haven’t I gone to any of these places and reshot them? Every one of these images is at least 15 years old, some or more than 20 years old. With the equipment and the knowledge I have now I could get some really nice images, prom worthy images, if I went back and reshot them. Plus, it would be great fun. The circumstances would have to be the same- some of these images represent years of going to the same place and finally getting a great situation- but that’s okay. I now have the time to pick and choose and go to just the best places at the best times to try to get the best shots. So why don’t I? [nggallery id=19] Perhaps it is complacency. Okay, it is certainly complacency. Shame on me! I got into photography for the joy of taking pictures- we all did. It developed into a job but I always tried to keep joy and necessity balanced when it came to taking pictures. I don’t think it is balanced any more. Over the last 10 years I have repeated said to myself “been there, done that.” How about you? Have you said that to yourself? Shame on us! That’s complacency and we have let it crowd out our joy of going out to amazing places and the thrill of taking pictures. We need to stop this behavior right now. [nggallery id=20] Here is what I am going to do: every year I am going to take a trip to revisit some of the places I used to love to go and photograph just for the fun of it. I will not have any projects in mind, I won’t be following a shooting list, I’ll just be out taking pictures at my old favorite haunts. Four or five days of good photography, good food (I hope) and good fun. Try this yourself. Doesn’t have to be any place exotic (but what a great excuse to go somewhere exciting again!) just someplace you used to love to go and haven’t gone in a long while. Yes things will be different but that’s okay, we are jut having fun. We can go back to our camera clubs and projects and shooting lists when we get home. Are you with me?
The World of Video Revisited.
I suppose I should tell you why I have decided to devote some time to learning proper video technique. The reason is pretty simple actually. It is because it is becoming increasingly apparent these days that video is an expected part of every website, presentation or promotion. And not just any video- high quality, professionally shot with professional audio. So if I want to continue to do book projects and promote myself professionally video is a necessary piece of the process. Back to the gas station. When last I blogged I was off to a local gas station to try to shoot a short 30 to 60 second promotional piece. We had already done a video of an interview of a long time customer (Bob) using two cameras and three mics so we had a story line to follow. Basically, we were trying to illustrate the interview. As easy as that sounds the madness is in the details. Just the act of pulling up to the pump was shot five different ways: with a camera behind the driver for a point of view shot, with a camera hanging out the left side passenger window on a counter-balancing steadying device, with a camera magnetically attached to the left side of the car behind the front tire, with a wide angle lens in front of the car that moved to the right as the car pulled up to the pump, and with a fisheye lens in front of the car that made it look like the car was about to drive right off the screen. All those shots we used for maybe 8 seconds of video. Then we needed shots of Bob rolling down the window to talk to the attendant- one shot from inside the car, one shot from outside in front and one shot from looking over the shoulder of the attendant. Did I mention shots of handing and also of taking the credit card? Of opening the fuel door? Of taking out the gas cap, of picking up the nozzle, of placing the nozzle in the gas tank, of taking out the nozzle from the gas tank? Of washing the windows (from inside and out) of the attendant walking to and away from the car and on and on and on? Oy, this stuff is hard!! We did all this shooting in 25 minutes with lots of redos, comic errors, horrendous shots, people walking into the shot, cameras appearing out of nowhere, misfocusing and the uncomfortable cutting of important appendages. We also included just pieces of appendages that were equally uncomfortable. Oy, this stuff is hard!! The result, expertly edited by Bob, was a truly and quite remarkably mediocre video. I am being kind actually. It was bad. But it was our bad and our first bad so that made it…well, still bad. We are going back tomorrow to shoot in the garage. Bob is sending what we did to them tonight. I’m figuring by then we will be greeted by a swarm of flying wrenches. How many shots of that do you think we will need?
Oy, This Stuff is Hard!
My brain is about to explode! And no, it is not because my NY Giants are actually in the Super Bowl with a half-way decent chance to win. It is something even harder to fully comprehend- video! Not the simple amateurish-looking video you see on U-Tube but the lush, almost cinematic video with deep rich sound and wonderfully storytelling you see…well, you hardly see at all. The place I always see it is on Bob Krist’s website and that is why right now I am at Bob’s house trying to get my cognitive arms around this completely different and confounding animal called video. Turns out, there is very little overlap between shooting stills and shooting video. At their most basic both remain being about capturing light- the prettier the light the prettier the still and video. Both can also be done these days with digital cameras, even inexpensive digital camera, and get great results. In fact, one of the best Nikon cameras for video is the D5100, a $750 camera. When shot next to my D3s, a $5000 camera, the D5100 produces far superior video. Bob also showed us the little SONY HV9X, a point and shoot camera that he has used to take beautiful video clips. The BBC even uses it for some of their news footage. Just like with still photography, you don’t have to spend loads of money to get great images. That’s where the similarities end as far as I can tell. When shooting video, it is all about the passage of time, something still shooters never think about. Every video you have ever seen starts at the beginning of something and goes to an end of that something. You haven’t noticed it before because when done right the passage of time is seamless and invisible. For me, so far, capturing the passage of time is as seamless as a patchwork quilt and as invisible as the Empire State building. Oy, this stuff is hard. So after 30 years of photographing stills I am adding video to my repertoire and trying to learn to think completely differently about telling a story. Rather than 100 images to tell the story about a farm or a lobsterman or whatever in a book or a presentation with video you get 3 to 4 minutes. With 15 – 20 clips per minute that’s 45 to 120 three to four second clips. A clip is a single action or scene. 100 of them! Oy, this stuff is hard. Oops, class is about to start again. We are going to a local gas station to try a video about filling up a car with gas. Sounds easy doesn’t it? It no longer does to me! I’ll give you a complete report on my next blog.
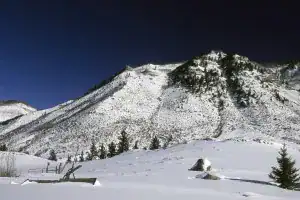
This is why we wait

This pair of photos was taken about 10 minutes apart while I waited for something to happen at Wonder Lake in Denali National Park. Unfortunately, not everyone waited until the last possible moment. They was a non existent sunset and figured nothing was going to happen. Oops! So here is the rule for the new year: if you are waiting for sunset wait the whole time, don’t leave early because you are hungry or bored or impatient. My best sunsets have occurred when the sun poked out just at the horizon and lit the sky up with fantastic colors. Slow down, take a breath, relax. You may just get lucky!